Let’s continue from where we interrupted in the first part of this article.
We will now see how to implement a simple Bot. In the diagram below we summarize the list of components we need:
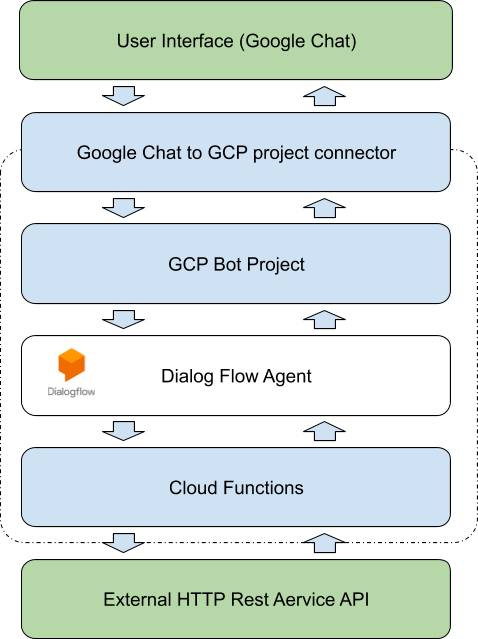
In the dotted box we have enclosed the components that we will actually have to implement.
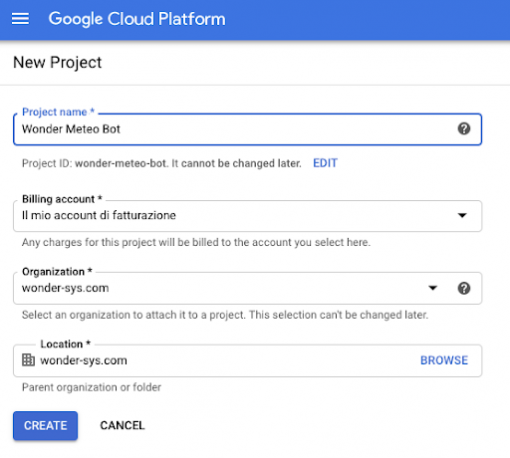
We then open the GCP console https://console.cloud.google.com/ and we create the new project
First of all we need to enable the chat API, navigating to API & Services> Dashboard and clicking on “Enable APIs And Services”. Then we can type “chat” in the search box and enable “Hangouts Chat API” and “Dialog Flow API”.
“Why does the APIs need to be enabled?”
In this case our project is a Google Chat API client. As a client, you can use the service and generate a cost. The project administrator must therefore only enable the services strictly necessary for the operation of the project. Developers working on the project will therefore only be able to use the enabled APIs.
We then enter the “Hangouts Chat API” console and click on “Configuration” in the menu on the left.
Now let’s customize our Bot by choosing the name, the avatar and writing a short description.
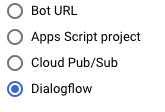
Before configuring our Bot we must decide which service the Bot will rely on to work. The options made available by Google are four:
Before diving into details of each option let’s try to understand the meaning of this point. We need to take a step back and clarify some aspects.
Imagine using a chat with your colleagues in a thematic “room”. In this same room there is also a Bot that participates in the conversation; one of the human participants can then ask the Bot a question. In our case you can ask for example: @WeatherBot what’s the weather like tomorrow?
Or, to give another example, we might ask the price of a given asset on the financial market.
What happens behind the scenes is extraordinary and using a tool like Google Chat we will not have to deal with anything other than the logic of the Bot, as we will see later. The Google Chat service will forward our question to the Bot in one of the ways listed above. Depending on the method we choose and the nature of the Bot, this can respond synchronously or asynchronously. It seems a very technical detail but we will see later that this aspect is very important. For simplicity, let’s say that once the Bot service has been queried, it can reply with an “ok received, I’ll think about it and I’ll let you know” or directly with the answer: “Tomorrow it will be sunny”.
In the case of an asynchronous response, the Bot will continue to work and search for the information we have requested and will intervene in the chat only once the answer is found.
Let’s see now, step by step, what these options mean:
Boot URL
If we choose this option we will have to implement an HTTP service that responds directly to requests coming from the chat. This is the method of choice if you want to use one of the many Bots available on the internet.
App Script Project
We can link our bot to a project made with App Script, another Google Workspace product for creating simple apps. More information on this product can be found here https://www.google.com/script/start/.
Cloud Pub/Sub
https://cloud.google.com/pubsub/
Pub/Sub is the messaging system of the Google Cloud Platform. With this channel we can reach any service, even, for example, a physical server or a PC where we install the Pub/Sub client. This option could be interesting if we want to query a server about the status of a process, for example. Let’s imagine that we have a server (in the cloud or in our network or private datacenter) that manages our e-mail, you can query it to know how many e-mails it has received and sorted today.
Dialog Flow
In all the previous options, the responsibility for managing the dialogue with the user is left to the service. Whoever writes the service that provides the information will have to take care of interpreting the requests of our users, understanding the context, asking for clarifications before giving answers. All these things can be handled brilliantly with Dialog Flow. Let’s see with our example how to use it.
Before continuing, let’s open the Dialog Flow console https://dialogflow.cloud.google.com/ and create our first agent.
To create an agent we need to understand what its basic elements are:
– Intents
– Entities
– Fulfilments
The agent must be able to manage a certain number of “Intents” or “what the user wants our agent to do”.
In the case of our example, let’s consider the intent “I want to know what will be the weather like tomorrow”, but keep in mind that a Dialog Flow agent can handle even more intentions, as long as we are able to understand, from the question, what the intent of the user is.
All Dialog Flow agents are born with a preconfigured intent called “Default Welcome Intent” which takes care of greetings and is there because we want our Bot to be nice with the users.
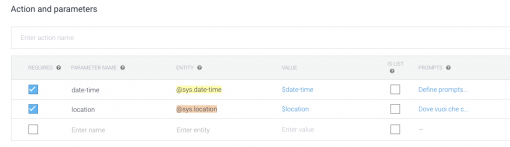
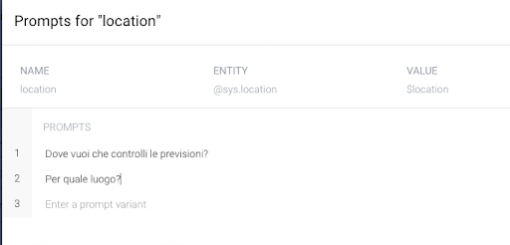
The “Entities” are the data that the agent must be able to extract from the user’s questions, for example in our case, the place and date for which we want the forecasts. Dialog Flow is able to automatically identify this information within the sentences.
The “Fulfillments” are the actions that the agent must perform to fulfill the user’s request.
We then create our “Forecast Intent”.
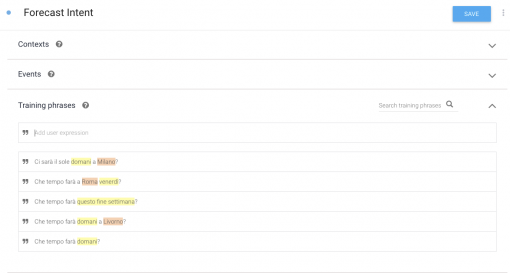
In the “Training phrases” section we type some example sentences. We see that Dialog Flow automatically highlights the “Entities” and is able to automatically distinguish between where and when.
The entities “@ sys.date-time” and “@ sys.location” are in fact system Entities, therefore they are already foreseen in Dialog Flow and for our example we will not have to define others.
What happens if the user asks for example: “What’s the weather like tomorrow?”
In this case our agent won’t know where. Obviously, knowing the context, we could assume that the user is asking for information about the location where he currently is, but although this approach is very intelligent it is currently beyond the scope of our small example. In general, the agent will now have to ask the user a question to ask which place he wants to know the forecast for tomorrow.
Let’s see how to do it.
We define our parameters as “Required” and Dialog Flow will allow us directly to specify which question to ask the user to get the missing information.
At this point we can move on to fulfillment, i.e. take this information and pass it on to our favorite forecasting service.
In this example we will use the APIs provided by https://openweathermap.org/
To do this we will need to write some code, but we will not have to worry about installing anything or even deciding where to run it. Thanks to the Dialog Flow integration with GCP it is possible to use the serverless technology of the Cloud Functions directly from the Dialog Flow interface.
We enable fulfillment for our Intent, scrolling down we identify the “Fulfillment” section and activate the “Enable webhook call for this intent” item.

Let’s now go to the “Fulfillment” page from the menu on the left. From here we have two possibilities:
– Webhook
– Inline Editor
Again we are offered the possibility, using webhooks, to send the request to an external service. In our case, the “https://openweathermap.org/” service would not be able to interpret the information passed by the dialog flow agent. For this reason, we need to write some code to translate the parameters of the agent request in something our weather API can interpret.
We then enable the “Inline Editor” section. From this section we could write some code that will be distributed on a Cloud Function within the Google Cloud Platform project associated with Dialog Flow. It is the same editor that we will find in the GCP console of the project and it adds nothing to a manual distribution except the convenience of being able to do everything from the same web interface (that of Dialog Flow in fact).
The function we are going to write will be an http type function whose name, and therefore the generated endpoint, must be “dialogflowFirebaseFulfillment”
Dialog Flow offers us the example code editor that we can modify.
In the body of the main function we find these two statements:
console.log (‘Dialogflow Request headers:’ + JSON.stringify (request.headers));
console.log (‘Dialogflow Request body:’ + JSON.stringify (request.body));
So let’s try to make a call to our bot and let’s see in the logs what is passed from Dialog Flow to fulfillment.
An interesting feature of the Dialog Flow interface is the “Try it now” section on the top right from where we can test our Agent.
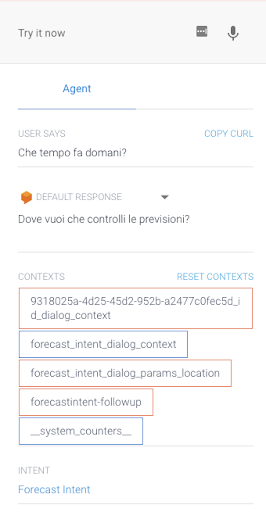
An example on the left. To our question “What’s the weather like tomorrow?” the agent asks us “Where do you want me to check the forecasts?”. We see that the Context is also populated. The context is a very useful aspect for the agent to speak with us, but it is currently outside this discussion.
Below we see that the agent has identified the right intent or our “Forecast Intent”.
So let’s answer with a place, for example “In Florence” and let’s see if our cloud function is invoked and with what parameters.
To do this we can click on “View execution logs in the Google Cloud Console”. Bottom in the Fulfillment window.
We then analyze the payload of the call, or the information that the agent passes to our function.
{
“responseId”: “a78ef52a-5c5a-4d11-8474-9455fca497d0-ce5e18e2”,
“queryResult”: {
“queryText”: “Firenze”,
“parameters”: {
“date-time”: “2020-11-27T12:00:00+01:00”,
“location”: {
“country”: “”,
“city”: “Firenze”,
“admin-area”: “”,
“business-name”: “”,
“street-address”: “”,
“zip-code”: “”,
“shortcut”: “”,
“island”: “”,
“subadmin-area”: “”
}
},
“allRequiredParamsPresent”: true,
…
}
The payload of the request contains the parameters we need to query our weather service. So let’s write the function to pass these parameters to the openweathermap.org/ API and formulate a response for the agent with the method.
agent.add(“….”)
In our example, we will use the forecast Open Weather Map API:
https://openweathermap.org/forecast5#name5
This requires, in addition to the api key, the name of the city. An example of a request is the following
GET https://api.openweathermap.org/data/2.5/forecast?q=Firenze&appid={API key}
So in our code, we extract the information we need from the payload:
const city = request.body.queryResult.parameters.location.city;
const dateRaw = request.body.queryResult.parameters[‘date-time’];
We then use the city parameter to call our service, and we use the service response to create our response. In case of error, we inform the user that something went wrong.
return axios.get(‘https://api.openweathermap.org/data/2.5/forecast’, {
params: {
q: request.body.queryResult.parameters.location.city,
units: ‘metric’,
lang: ‘it’,
APPID: OW_API_KEY
}
}).then((apiResponse) => {
const reply = owResponseToHuman(apiResponse);
agent.add(reply);
}).catch((err) => {
error(err);
agent.add(`Mi dispiace, qualcosa è andato storto! ${err.message}`);
return true;
});
We deploy our function directly from Dialog Flow, clicking on the Deploy button and we’re done. We can now query our Bot from Google Chat!


You can find the code used for the Cloud Functions here:
https://github.com/wondersys/wonder-meteo-bot
Simone Bracaloni
Senior Software Engineer @ Wondersys